현재 까지 프로젝트를 실행을 하게 되면 NDC 공간에 있는 오브젝트 만 보이는데 이제 투영을 통해서 그려볼 예정
※ NDC : 각 오브젝트의 자신만의 공간을 의미 X,Y -1 ~ 1 사이로 표현
1. WVP 관련 지식
변환 과정
NDC 공간에서 World 넘어 갈때 VS 에서 바꿔준다 (2D -> 3D)
World 공간에서 다시 ViewPort변환 후 RS에서 필요 없는 부분은 잘라준다 변환 해준다 (3D -> 2D)
※ 최종 출력전에 Orthgraphic Projection 또는 Perspective Projection 통해서 최종적으로 출력

앞으로 World(월드), View(카메라), Projection(투영 공간) 사용하는데 필요한 구조체는 D3DXMATRIX 이고 4*4 형태의 행렬이다.

Matirx 관련
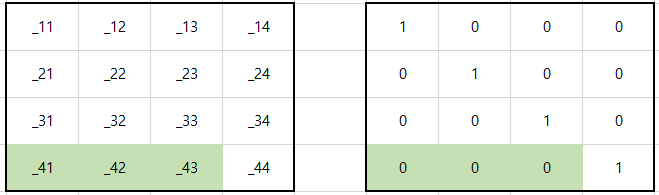
생성, 항등 행렬
1. 기본적으로 Matirx 구조체를 생성 하게 되면 모든 값이 0으로 셋팅이 된다.
2. 행렬에 0이 들어가면 출력이 안나오기 때문에 모든 Matirx 구조체들은 D3DXMatrixIsIdentity 함수로 항등행렬(단위행렬)로 값을 셋팅.

Position, Scale
위치값이 들어가는 정보
크기값이 들어가는 정보

2. 작성
Scene.cpp 상단 변수 만드는 영역에 Matrix 구조체 3개 선언
※ stdafx.h안에 typedef 통해서 이름 재정의 한 구조체 사용

Scene.cpp -> void InitScene()
※ W, V, P 관련 값 셋팅
void InitScene()
{
	shader = new Shader(L"01_Effect.fx");

	//VertexBuffer Setting & Create VertexBuffer
	{...}

	// Index Buffer & IndexBuffer Setting
	{...}

	//항등행렬 초기화
	D3DXMatrixIdentity(&World);
	D3DXMatrixIdentity(&View);
	D3DXMatrixIdentity(&Projection);

	//Model에 배치될 World의 값
	//World를 찍을 View(카메라) 값 (저장할 값, 바라볼 위치, 바라볼 방향, 임의 보조값)
	//최종 카메라 출력할 Projection(Orthgraphic)선택 및 값 (저장할 값, 바라볼값 정의(Left, Right, Bottom, top), near ,far)
	{
		World._41 = Width/2, World._42 = Height/2;

		Vector3 eye = Vector3(0, 0, 0); //카메라 위치
		Vector3 at  = Vector3(0, 0, 1); //카메라 바라보는 방향
		Vector3 up  = Vector3(0, 1, 0);
		D3DXMatrixLookAtLH(&View, &eye, &(eye + at), &up);

		D3DXMatrixOrthoOffCenterLH(&Projection, 0, (FLOAT)Width, 0, (FLOAT)Height, -1.0f, +1.0f);
	}

	//Set WVP
	shader->AsMatrix("World")->SetMatrix(World);
	shader->AsMatrix("View")->SetMatrix(View);
	shader->AsMatrix("Projection")->SetMatrix(Projection);
}
02_WVP.fx
※ 해당 wvp용으로 쉐이더 작성
//--WVP
matrix World, View, Projection;

//---------------------------------------------------
//-------------------구조체 정의---------------------
//---------------------------------------------------
struct VertexInput
{
	float4 Position : Position;
	float4 Color : Color;
};

struct VertexOutput
{

	float4 Position : SV_Position;
	float4 Color : Color;
};

//---------------------------------------------------
//--------------cpu -> gpu에 값을 받는곳--------------
//---------------------------------------------------
VertexOutput VS(VertexInput input)
{
	VertexInput output;
	//output.Position = input.Position; //사용 안함
        output.Position = mul(input.Position, World);			// NDC * World
	output.Position = mul(output.Position, View);			// World * ViewSpace(Camera)
	output.Position = mul(output.Position, Projection);		// ViewSpace * ViewOption (2D에서는 Orthgraphic)

	output.Color = input.Color;

	return output;
}

//---------------------------------------------------
//------------------Pixel 처리 하는곳-----------------
//---------------------------------------------------
//float4 Color = float4(1, 0, 0, 1);
float4 PS(VertexOutput input) : SV_Target
{
	//return Color;
	return input.Color;
}

//---------------------------------------------------
//-------Pass 번호를 통해서 계산된 값 출력-------------
//---------------------------------------------------
// 쉐이더 결과값을 기존 c++ 에서 blob을 통해서 저장해서 사용 한걸 gpu 에서 아예 셋팅
// technique : pass 관련 관리
// pass : vs, ps 처리하는 방식
technique11 T0
{
	pass P0
	{
		SetVertexShader(CompileShader(vs_5_0, VS()));
		SetPixelShader(CompileShader(ps_5_0, PS()));
	}
}
참고 shader 파일 넣는 파일명도 수정 후 실행 하면 잘못된 것 처럼 아무것도 안보이는 것처럼 느껴지지만 크기 1짜리 정사각형이 정가운데에 있다.
※ World Matirx에 추가로 작성해야 하는 내용이 있다.


3. 수정 & 응용
World Matirx에는 모델에 대한 Scale(크기)와 Position(위치) 값이 같이 있는데 위에 코드로는 위치 값만 있고 크기 값이 1이기 때문에 해당 화면의 전체 크기에서 1의 크기만 가지게 된다.
stdafx.h 수정
※ Debug용 cmd창이 가지고 싶어서 만들어둠 (ImGui로 봐도 상관 없음)
//디버그 모드
#ifdef _DEBUG
#pragma comment(linker, "/entry:WinMainCRTStartup /subsystem:console")
#endif
#include <iostream>
using namespace std;
void InitScene() -> World 셋팅
※ 콘솔과 이제 화면에 100 크기의 정 사각형 네모가 출력이 된다
void InitScene()
{
	//shader = new Shader(L"01_Effect.fx");
	shader = new Shader(L"02_WVP.fx");

	//VertexBuffer Setting & Create VertexBuffer
	{...}

	// Index Buffer & IndexBuffer Setting
	{...}

	//항등행렬 초기화
	//D3DXMatrixIdentity(&World);
	D3DXMatrixIdentity(&View);
	D3DXMatrixIdentity(&Projection);

	//Model에 배치될 World의 값 (크기와 위치를 가짐)
	//World를 찍을 View(카메라) 값 (저장할 값, 바라볼 위치, 바라볼 방향, 임의 보조값)
	//최종 카메라 출력할 Projection선택 및 값 (저장할 값, 바라볼값 정의(Left, Right, Bottom, top), near ,far)
	{
		D3DXMATRIX S, T;
		D3DXMatrixScaling(&S, 100, 100, 1.0f);
		D3DXMatrixTranslation(&T, Width/2, Height/2, 0.0f);
		World = S * T;

		Vector3 eye = Vector3(0, 0, 0); //카메라 위치
		Vector3 at  = Vector3(0, 0, 1); //카메라 바라보는 방향
		Vector3 up  = Vector3(0, 1, 0);
		D3DXMatrixLookAtLH(&View, &eye, &(eye + at), &up);

		D3DXMatrixOrthoOffCenterLH(&Projection, 0, (FLOAT)Width, 0, (FLOAT)Height, -1.0f, +1.0f);
	}

	cout << World._11 << "  " << World._22 << "  " << World._33 << endl;
	cout << World._41 << "  " << World._42 << "  " << World._43 << endl;

	//Set WVP
	shader->AsMatrix("World")->SetMatrix(World);
	shader->AsMatrix("View")->SetMatrix(View);
	shader->AsMatrix("Projection")->SetMatrix(Projection);
}

World, View, projection 응용 3가지
1. World 값 응용 void Update() -> Key 이벤트 변경
※ 기존엔 정점의 갯수만큼 계산을 하고 Resource로 값을 다시 셋팅 해야하는 계산량이 많았는데 이제 단순히 World의 Matrix 값만 조절 해서 이제 쉽게 이동 할 수 있게 변경 (값만 넘기면 Shader에서 계산)
2. View 값 응용
※ 키보드로 아닌 ImGui의 slider 옵션으로 통해서만 좌우로 이동
3. Projection 응용
※ 기존엔 2D용 Orthgraphic아닌 Perspective으로 변경후 View의 z축 값만 조절
Vector3 postiion = Vector3(400, 300, 0);
void Update()
{
	//Key
	{
		if (Key->Press('A'))
			postiion.x -= 0.1f;
		else if (Key->Press('D'))
			postiion.x += 0.1f;

		if (Key->Press('W'))
			postiion.y += 0.1f;
		else if (Key->Press('S'))
			postiion.y -= 0.1f;
	}

	//World 응용
	{
		D3DXMATRIX S, T;
		D3DXMatrixScaling(&S, 100, 100, 1.0f);
		D3DXMatrixTranslation(&T, postiion.x, postiion.y, 0.0f);
		World = S * T;
		shader->AsMatrix("World")->SetMatrix(World);
	}
	//View 응용
	{
		ImGui::SliderFloat("View Position X", &View._41, -800, +800);
		ImGui::SliderFloat("View(Perspectve 3D) Position Z", &View._43, -800, +800);
		shader->AsMatrix("View")->SetMatrix(View);
	}
	//Projection 응용 (3D)
	{
		float fov = 3.141 * 0.5f;
		float aspect = (float)Width / (float)Height;

		D3DXMatrixPerspectiveFovLH(&Projection, fov, aspect, 0, 1000);
		shader->AsMatrix("Projection")->SetMatrix(Projection);
	}
}
실행
Orthgraphic, Perspective 차이점은 구글링 해서 찾으면 카메라 관련된 내용이 많으니 검색
https://github.com/ascher8159/DX2D
DX2D_09
'DirectX > DirectX 2D' 카테고리의 다른 글
| DX2D_10 Rect (0) | 2022.12.07 |
|---|---|
| DX2D_9 WVP2 (1) | 2022.12.04 |
| DX2D_08 ImGui (0) | 2022.11.27 |
| 정리 & Plug in (0) | 2022.11.26 |
| DX2D_07 Librarie 및 Utilitie (0) | 2022.11.24 |